
Red velvet tiramisu is one of the most visually seductive dessert mashups on the internet — but if you’ve tried the recipes already floating around, you already know the disappointment: soggy layers, a cream that tastes like sweetened paste, and a “red” that fades to a sad, muddy orange by morning. This post fixes all of that, for good.
This red velvet tiramisu recipe was built from the ground up with two equal ambitions: honor what makes classic tiramisu extraordinary (that silky, barely-sweet cream and the deep, bittersweet backbone) and honor what makes homemade red velvet cake so beloved (the tang, the subtle cocoa, the drama of that color). When both components are treated with equal respect, the result is nothing short of stunning.
Recipe At A Glance
- Prep Time: 35 minutes
- Chill Time: 4 hours minimum (overnight preferred)
- Difficulty: Intermediate
- Servings: 12
- Dish Size: 9×13 inch (23×33 cm)
Why This Red Velvet Tiramisu Works
The flavor chemistry here is genuinely elegant. Classic red velvet batter uses only 1 to 2 tablespoons of Dutch-process cocoa per standard batch — intentionally restrained so the cream and vanilla carry the flavor. That same restraint is exactly what tiramisu requires. Espresso-bitter, barely-cocoa, cream-forward: the two desserts were practically designed for each other.
The soaking liquid is where most recipes stumble. Traditional espresso alone is too sharp and too dark for red velvet layers — it overpowers the delicate cocoa and turns the color muddy. Our version uses a buttermilk-laced soaking liquid that echoes the tang foundational to every great red velvet recipe, while a small shot of cooled espresso adds just enough depth without dominating.
What Makes This Red Velvet Tiramisu Recipe Different
Three specific decisions separate this red velvet tiramisu recipe from everything else in your browser tabs right now.
First, the soaking liquid. We use a blend of buttermilk, cooled espresso, and a touch of vanilla. Buttermilk brings the signature tang that defines red velvet without waterlogging the ladyfingers. It also keeps the layers tasting cohesive — not like two different desserts stacked on top of each other.
Second, the cream ratio. The mascarpone cream uses a 60% mascarpone to 40% cream cheese split. Full-mascarpone versions taste flat and fatty. Full-cream-cheese versions taste like cheesecake filling. The combination delivers richness from the mascarpone and a subtle, pleasant tang from the cream cheese that mirrors the tang in the soaking liquid. Every bite tastes intentional.
Third, the color strategy. Instead of drowning the recipe in a whole bottle of liquid red dye (which adds excess moisture and an artificial aftertaste), we use 1 to 2 teaspoons of gel food coloring. For a natural alternative, 2 to 3 tablespoons of concentrated beet powder achieves a comparable deep crimson hue. If you love beet-based baking, check out our vegan red velvet cake with beetroot for more detail on working with this technique.
Ingredients for Red Velvet Tiramisu
For the Red Velvet Layers
- 24 to 30 Savoiardi ladyfingers (two layers for a 9×13 dish)
- 1 cup (240ml) buttermilk
- 2 shots (60ml) cooled espresso or strong brewed coffee
- 1 teaspoon pure vanilla extract
- 1 to 2 teaspoons red gel food coloring (or 2 to 3 tablespoons beet powder)
- 1.5 tablespoons Dutch-process cocoa powder (for dusting the soaking liquid)
For the Mascarpone Cream
- 16 oz (450g) mascarpone cheese, at room temperature (68 to 70°F)
- 8 oz (225g) full-fat cream cheese, softened to room temperature
- 1 cup (120g) powdered sugar, sifted
- 1.5 cups (360ml) heavy whipping cream, cold
- 1.5 teaspoons vanilla bean paste (preferred) or pure vanilla extract
- 3 large egg yolks (optional, for richer traditional flavor)
For Finishing
- 2 to 3 tablespoons unsweetened Dutch-process cocoa powder (for dusting at serving time)
- Red velvet cake crumbles for garnish (optional but highly recommended for visual contrast)
- White chocolate shavings for garnish
How to Make Red Velvet Tiramisu Step by Step
Phase 1 — Prepare the Soaking Liquid and Workspace
- Whisk together the buttermilk, cooled espresso, vanilla extract, and gel food coloring in a shallow bowl until the color is evenly distributed and fully saturated. Set aside at room temperature.
- Add the cocoa powder to the soaking liquid and whisk again until no lumps remain. The liquid should be a deep, vivid red-burgundy color at this stage.
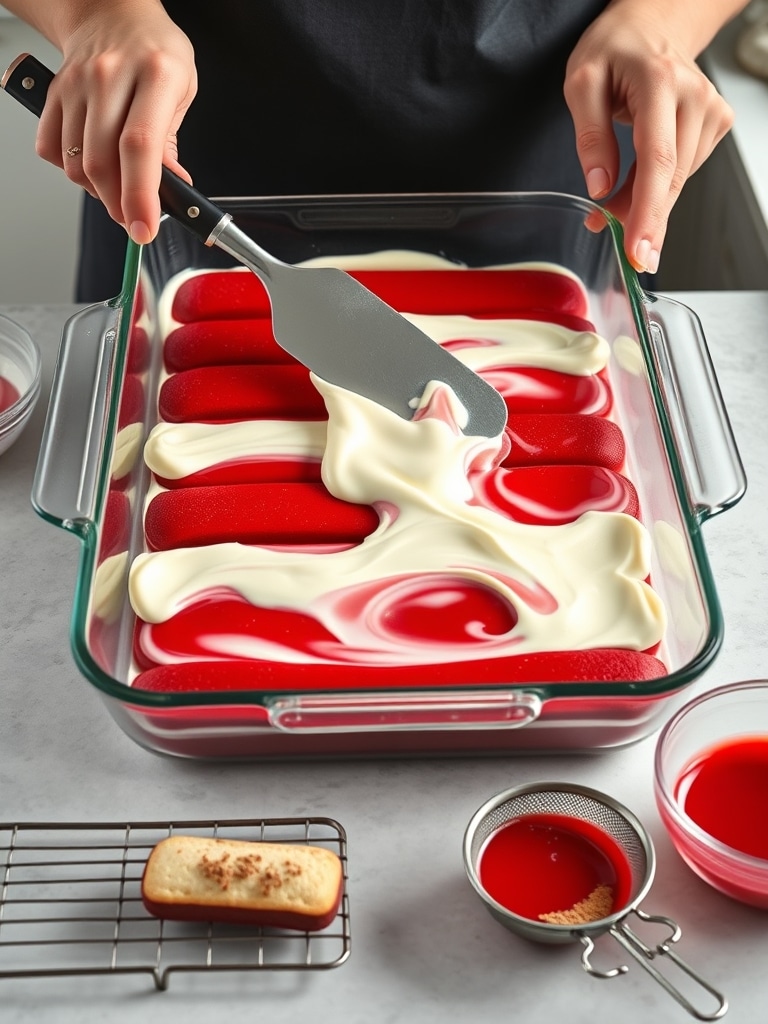
- Place a wire rack next to your assembly dish. You will rest the dipped ladyfingers here for 30 seconds before layering — this single step is what prevents a soggy base.
Phase 2 — Build the Mascarpone Cream
- In a large mixing bowl, beat the room-temperature mascarpone and cream cheese together on medium speed for 2 minutes until completely smooth with no lumps. Both must be at 68 to 70°F before you begin — cold dairy fat seized during whipping is the number one cause of a broken, grainy cream layer.
- Add the sifted powdered sugar and vanilla bean paste, then beat on low until combined. If using egg yolks, whisk them with 2 tablespoons of the powdered sugar until pale before folding in at this stage.
- In a separate chilled bowl (place your bowl and whisk in the freezer for 15 minutes beforehand for best results), whip the cold heavy cream to medium-stiff peaks.
- Fold the whipped cream into the mascarpone mixture in three additions using a wide silicone spatula, using slow, deliberate strokes to preserve the volume. The finished cream should be thick, glossy, and pipeable.
Phase 3 — Layer, Set, and Chill
- Working quickly, dip each ladyfinger into the soaking liquid for no more than 1 to 2 seconds per side. Place on the wire rack for 30 seconds, then arrange in a single, tight layer across the bottom of your 9×13 dish.
- Spread or pipe half the mascarpone cream in an even layer over the soaked ladyfingers. Use an offset spatula or piping bag for a level, professional finish.
- Repeat with a second layer of dipped ladyfingers, then top with the remaining mascarpone cream. Smooth the top completely flat.
- Cover tightly with plastic wrap pressed directly against the cream surface to prevent a skin from forming. Refrigerate for a minimum of 4 hours, though overnight (8 to 12 hours) is strongly preferred for clean slicing and fully melded flavors.
Mistakes That Ruin Red Velvet Tiramisu
Consider this section the knowledge gap that separates a soggy, disappointing result from a bakery-worthy one. Every problem below has a precise fix.
Soggy ladyfinger layers come from over-soaking. The 1 to 2 second rule is non-negotiable. Rest dipped fingers on a wire rack before layering to allow surface moisture to redistribute rather than pool at the base.
Broken or grainy mascarpone cream is almost always a temperature problem. Both mascarpone and cream cheese must be fully at room temperature before the mixer touches them. Cold fat does not emulsify — it seizes, creating a lumpy, separated mess that cannot be fully rescued.
Dull, orange-tinted red happens when you use liquid food coloring instead of gel, or when the coloring is not fully dispersed before the dry ingredients are folded in. Always use gel and mix the color thoroughly into the wet soaking liquid first. A pinch of unsweetened cocoa (less than ¼ teaspoon) added directly to the dye can counteract warm orange tones and push the color toward a true, deep crimson.
Flat, indistinct layers when sliced are a sign the cream was spooned rather than spread with precision. Pipe or use an offset spatula, and ensure each ladyfinger layer is completely level before the cream goes on top. This is the detail that makes a cross-section photograph worth posting.
Pro Tips From the Test Kitchen
These are the details that elevate a good red velvet tiramisu dessert into an unforgettable one.
- Chill your mixing bowl and whisk attachment in the freezer for 15 minutes before whipping the cream layer. Cold equipment stabilizes fat and produces a firmer, more pipeable consistency.
- Vanilla bean paste outperforms extract in the cream layer. The tiny flecks are visually stunning against the white cream and the flavor is noticeably deeper and more floral.
- Never dust the cocoa powder topping more than 2 hours before serving. Cocoa applied too early absorbs moisture from the cream and loses its beautiful matte, photogenic appearance completely.
- For the cleanest slices, dip a sharp knife in hot water and wipe it dry between every single cut. This is the same technique used in professional patisseries for classic tiramisu and layered cakes.
- Use a ruler or straight bench scraper to level your cream layers before chilling. The payoff in the final cross-section is dramatic.
- If you love the individual serving format, our red velvet tiramisu cups version walks you through portioning this exact recipe into elegant individual glasses — perfect for dinner parties.
Red Velvet Tiramisu Variations
Vegan Red Velvet Tiramisu
Replace mascarpone with raw cashew cream (cashews soaked overnight, blended smooth with a tablespoon of lemon juice and 3 tablespoons of full-fat coconut cream). Replace cream cheese with your preferred vegan cream cheese block. For the cream structure, use aquafaba whipped to stiff peaks in place of egg yolks. Add 1 to 2 extra hours of chill time to compensate for the lower fat density of plant-based alternatives. For more dairy-free baking inspiration, browse our vegan red velvet cake post for complementary techniques.
Gluten-Free Red Velvet Tiramisu
The only structural swap needed is the ladyfinger component. Source gluten-free Savoiardi if available, or bake homemade GF ladyfingers using a 1:1 gluten-free flour blend (Bob’s Red Mill or King Arthur measure-for-measure both work reliably). GF ladyfingers need 2 to 3 extra minutes of bake time and a longer cooling period. Crucially, reduce your soaking time to just 1 second per side — they are more fragile and absorb liquid much faster than traditional Savoiardi.
Keto / Low-Carb Red Velvet Tiramisu
Replace ladyfingers with a thin almond flour sponge sheet: combine 2 cups almond flour, 4 eggs, 1 teaspoon baking powder, and a pinch of salt, bake at 325°F (163°C) for 12 to 14 minutes in a rimmed sheet pan, then cut into finger-width strips once cooled. Replace powdered sugar with powdered erythritol at a 1:1 ratio (if using monk fruit sweetener, reduce quantity by about 25% due to its higher perceived sweetness). The texture holds beautifully after chilling — this version is genuinely impressive.
Red Velvet Tiramisu Cake (Springform Format)
For a dramatic vertical slice presentation, assemble the entire recipe inside a 6-inch or 8-inch springform pan lined with acetate strips. The acetate allows clean unmolding and reveals perfectly defined layers. Garnish the top as you would the standard format and unmold just before serving for maximum visual impact. This is the format that photographs best for social media — especially when you cut the first slice tableside.
Serving Suggestions for Red Velvet Tiramisu
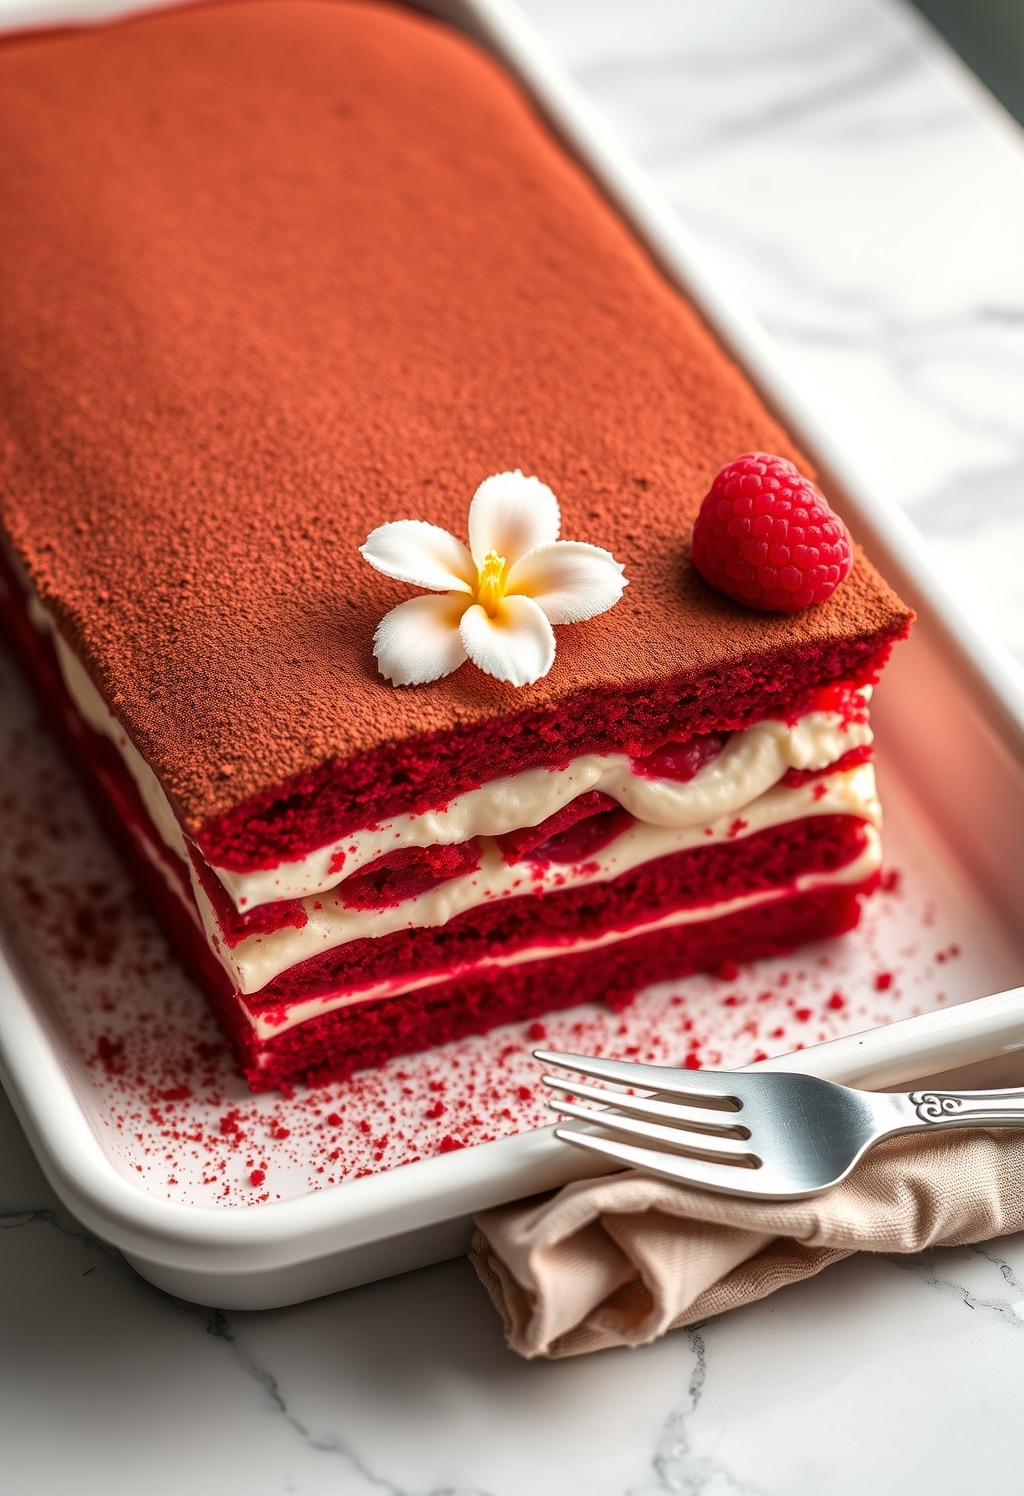
Presentation is half the experience with this dessert. Build your garnish from the surface of the cream outward: start with a fine, even dusting of Dutch-process cocoa powder applied through a fine-mesh sieve at the very last moment. Then scatter red velvet cake crumbles across the center third of the dish (not edge-to-edge, which reads as messy). Add asymmetric white chocolate shavings or curls for height and contrast. Finish with 3 to 5 fresh raspberries or a single edible flower for a final touch of color and elegance.

For a piped border, a 1M star tip used to create cream rosettes along the outer edge transforms a home dessert into something that looks genuinely professional. Serve cold — straight from the refrigerator — with a small cup of espresso or a glass of sparkling Prosecco alongside. The contrast between the cold, creamy dessert and the hot coffee is part of the magic.
For more elegant layered dessert ideas that photograph just as beautifully, our tiramisu cupcakes are a wonderful companion recipe worth bookmarking.
Storage and Meal Prep Tips
This is one of the best make-ahead desserts for dinner parties you can possibly choose. The quality actually peaks at the 24-hour mark when the layers have fully melded without the ladyfingers over-softening — so making it the night before is not just acceptable, it is genuinely recommended.
The assembled tiramisu can be made up to 48 hours in advance. Cover it tightly with plastic wrap pressed directly against the cream surface to prevent a skin from forming. In the refrigerator it stays fresh for up to 3 days total — beyond that, the ladyfinger texture begins to deteriorate noticeably.
For freezing, individual portions can be stored in airtight containers for up to 1 month. Thaw in the refrigerator for 6 to 8 hours — never at room temperature, as the cream layer will weep and separate. Expect a slight softening of the ladyfinger texture post-freeze, which is normal and unavoidable. Always apply the cocoa powder garnish fresh at serving time, never before freezing or refrigerating.
Nutritional Information
- Calories: 385 kcal
- Protein: 6g
- Carbohydrates: 28g
- Fat: 28g
- Saturated Fat: 17g
- Fiber: 0.5g
- Sugar: 18g
Nutritional values are estimates based on standard ingredient brands. Values will vary with substitutions.
Final Thoughts on Red Velvet Tiramisu
If you have been eyeing red velvet tiramisu for a while but kept putting it off because the recipes you found looked fiddly or unreliable, I hope this post has changed that. The buttermilk soaking liquid, the precise cream ratio, the gel coloring strategy, the temperature discipline — none of it is complicated when you understand the why behind each decision. And once you understand the why, you can make it confidently every single time.
This red velvet tiramisu is genuinely one of those desserts that earns a room-wide moment of silence when it hits the table. The deep crimson layers, the cloud-soft cream, the barely-there cocoa dusting — it is as beautiful to look at as it is to eat. Make it for your next dinner party, make it for a birthday, make it for a Tuesday if the mood strikes. It absolutely holds up to the occasion.
When you make it, I would love to see how it turns out. Share your photos in the comments below or tag us on Instagram — nothing makes a recipe writer happier than seeing a gorgeous cross-section slice come to life in someone else’s kitchen.
Frequently Asked Questions About Red Velvet Tiramisu
What is red velvet tiramisu and how is it different from classic tiramisu?
Red velvet tiramisu is a fusion dessert that combines the layered, cream-rich structure of classic Italian tiramisu with the flavor profile and visual drama of red velvet cake. The key differences are the soaking liquid (buttermilk-based rather than pure espresso), the cream layer (mascarpone blended with cream cheese for added tang), and the iconic deep red color achieved through gel food coloring or natural beet powder. The result is a dessert that is simultaneously familiar and completely unexpected.
Can I make red velvet tiramisu without raw eggs?
Absolutely. The egg yolks in the cream layer are entirely optional in this recipe. The mascarpone and cream cheese provide enough richness and structure on their own. If you prefer the traditional Italian tiramisu flavor that egg yolks contribute, use pasteurized egg yolks for a food-safe option. Either way, the cream sets beautifully after chilling.
How far in advance can I make red velvet tiramisu?
You can fully assemble red velvet tiramisu up to 48 hours in advance. The flavor actually improves significantly at the 24-hour mark as the layers meld together. Cover tightly with plastic wrap pressed against the cream surface and refrigerate. Do not add the cocoa powder or any garnishes until just before serving.
Why did my mascarpone cream turn grainy or lumpy?
This is almost always a temperature issue. Both mascarpone and cream cheese must be fully at room temperature (68 to 70°F) before you begin mixing. Cold dairy fat seizes when whipped, causing the cream to break and curdle. If it happens mid-process, fold in 1 to 2 tablespoons of room-temperature heavy cream by hand — not with a mixer — to re-emulsify the mixture.
What is the best way to get a true, vibrant red color in red velvet tiramisu?
Always use gel food coloring rather than liquid. Gel delivers a more saturated color with 1 to 2 teaspoons versus the 1 to 2 tablespoons required by liquid coloring — and the reduced liquid volume means the soaking mixture stays at the right consistency. For a fully natural approach, 2 to 3 tablespoons of concentrated beet powder works well. Add a tiny pinch of unsweetened cocoa (less than ¼ teaspoon) to the dye to counteract any orange warmth and push the hue toward true deep crimson.
Can I freeze red velvet tiramisu for later?
Yes, individual portions freeze well for up to 1 month in airtight containers. Always thaw in the refrigerator over 6 to 8 hours — never at room temperature, as the cream layer will weep and lose its texture. Expect a slight softening of the ladyfingers after freezing, which is normal. Apply any garnishes fresh at serving time after thawing.